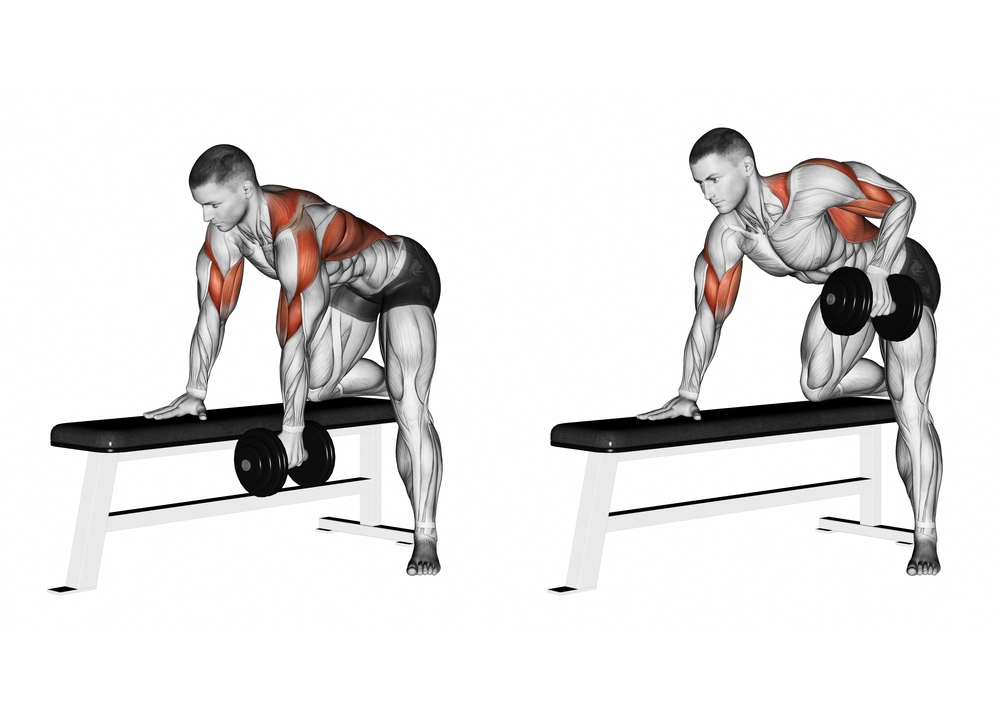
When it comes to building a strong, balanced back, the dumbbell row is a foundational exercise. But subtle changes in your grip—specifically, whether you use a neutral or pronated grip—can have a significant impact on the muscles you engage and the results you achieve. In this blog post, we’ll explore the differences between neutral and pronated grips in dumbbell rows, and how you can leverage both to maximize your back development.
Understanding the Neutral and Pronated Grips
Before diving into the muscle activation differences, let's break down what these two grips look like:
-
Neutral Grip (Palms Facing Inward):
In this grip, your palms face each other throughout the rowing movement. It’s a natural and comfortable position for your wrists and is often used in exercises like the hammer curl or during cable rows. -
Pronated Grip (Palms Facing Downward):
With the pronated grip, your palms face the floor as you perform the row. This grip is commonly seen in barbell rows and pull-ups and shifts the load distribution to different parts of the back.
How Grip Affects Muscle Activation
Your back is a complex group of muscles, each of which plays a slightly different role depending on your grip. Here's how each grip affects the major muscles during a dumbbell row:
-
Neutral Grip - Targeting Rhomboids and Lower Traps
The neutral grip primarily engages the rhomboids and lower trapezius muscles. These muscles are essential for retracting the shoulder blades and maintaining good posture. Because your elbows tend to stay closer to your torso during the row, the neutral grip also engages the latissimus dorsi to a significant degree, but it emphasizes deeper muscles that stabilize your shoulder blades. This grip is particularly useful if you’re looking to improve mid-back strength and scapular stability.Additionally, the neutral grip tends to feel more comfortable for people who experience wrist or shoulder discomfort, as it places less strain on these joints. It allows for better elbow alignment and often enables lifters to handle slightly heavier loads.
-
Pronated Grip - Focusing on Upper Back and Rear Delts
The pronated grip shifts the emphasis toward the upper trapezius, rear deltoids, and rhomboids. With your palms facing down, your elbows tend to flare out to the sides, bringing more activation to the upper part of the back, specifically the muscles responsible for elevating and rotating the shoulder blades. The posterior deltoid also gets more work with this grip, making it a great option if your goal is to develop broader shoulders and a more defined upper back.One downside of the pronated grip is that it places more strain on the wrists and may reduce the amount of weight you can lift. However, it is highly effective for targeting the upper back, an area that’s often underdeveloped in people focused solely on lat-heavy movements like pull-ups and lat pulldowns.
Strength and Muscle Symmetry Benefits
One of the key advantages of alternating between these two grips is the balance they provide for overall muscle development. Here’s how each contributes:
-
Neutral Grip for Back Thickness and Scapular Control:
If your goal is to build thickness in the middle of your back and improve your posture, the neutral grip is ideal. It allows you to focus on the muscles that pull the shoulder blades together and stabilize the shoulder joint. -
Pronated Grip for Width and Upper Back Definition:
The pronated grip, on the other hand, helps you develop the upper trapezius and rear delts, creating a "3D" look in your upper body. It’s also a great way to target muscles that may not be fully engaged during other pulling exercises like lat pulldowns or chin-ups.
By using both grips in your training program, you ensure that no muscle group is left behind. The neutral grip emphasizes the mid-back muscles, while the pronated grip helps build upper back and shoulder definition. This variety can lead to better overall strength and muscle symmetry.
Form Considerations for Each Grip
-
Neutral Grip:
- Keep your elbows tucked close to your body throughout the movement to maximize lat and rhomboid engagement.
- Avoid shrugging your shoulders up to ensure the lower traps and rhomboids are doing the work of pulling the shoulder blades together.
- Maintain a flat back and neutral spine, hinging at the hips to prevent lower back strain.
-
Pronated Grip:
- Let your elbows flare slightly outward, about 45 degrees from your torso, to hit the upper traps and rear delts effectively.
- Avoid rounding your shoulders forward, as this can place unwanted stress on your upper back and neck.
- Like the neutral grip, maintain a stable torso by engaging your core and keeping a slight bend in your knees.
When to Use Each Grip in Your Training
Incorporating both grips into your routine can help you achieve balanced muscle development. Here are a few ways to structure them into your back workout:
-
Neutral Grip for Strength Days:
Since the neutral grip allows for better joint alignment and typically lets you lift heavier weights, it’s perfect for strength-focused training days. Use it when performing lower reps (4-6) with heavier dumbbells to build back thickness and improve scapular control. -
Pronated Grip for Hypertrophy and Upper Back Focus:
On days where you want to emphasize muscle growth and target the upper back, switch to the pronated grip. Performing higher reps (8-12) with moderate weights will allow you to focus on the upper traps and rear delts for improved upper back definition. -
Superset for Maximum Engagement:
For a well-rounded back workout, try supersetting both grips in the same session. Start with the neutral grip to hit the lower and mid-back, then follow up with the pronated grip to emphasize the upper back. This approach ensures full engagement of all the muscles in your back.
Conclusion: Which Grip Is Best?
Both the neutral and pronated grips offer unique benefits, and neither is inherently better than the other. The neutral grip excels at building mid-back strength and improving shoulder stability, while the pronated grip is great for adding width and definition to the upper back. To maximize your back development, it’s best to incorporate both grips into your workout routine, ensuring a balanced, well-rounded physique.
Whether you’re aiming for size, strength, or definition, understanding how these small changes in grip can impact your results is key to optimizing your training. Use both grips strategically, and you’ll build a stronger, more symmetrical back that looks as good as it performs.


